CGMA - Level Design - Spaces and Modular Kits

Mountain Top Castle

ASSIGNMENT Spec

Engine: Unity Engine

Duration: 1 Week

For our second assignment we where tasked with using a small modular kit of a few objects. to build an environment that makes the player want to explore it and find an elusive treasure chest. No new geometry could be outside of minor terrain tools.

Design Goals

  • Attract the player to the castle entrance

  • Breadcrumb a series of clues leading to the treasure chests

  • Provide multiple paths with varying degrees of challenge

  • Minimize dead ends and ensure they provide exploration value if they exist.

Challenges

  • Maintaining clean pathways vs organic looking spaces

  • Working with a limited set of tools including player controller.

  • Framing new objectives after reaching a potential goal.

CGMA - Level Design - Impressionist Painting

Prompt Vs Rendition

Assigment Spec

Engine: Unity

Duration: 1 Week

Software: Maya

With our first assignment we where tasked with interpreting an impressionist painting by Henry Matisse into a blockout. Challenged to go beyond the painting and craft areas outside of view.

Design Goals

  • Establish a core path through the level using the tower as a landmark

  • Build a narrative by placing objects of interest like weapons, a fallen gunner, and other objects of interest through he core path.

  • Provide multiple areas for combat with interesting cover choices for the player.

  • Looping side paths to keep the player progressing

  • Set dressing just out of the map to make the space feel immersive.

God of War - Level Design Breakdown

God of War - Climbing Section

Recently I’ve been replaying the latest entry in the God of War series for research into level design techniques. There is a few areas later in the game that I’m particularly excited about researching. However in my travels through Midgard I stumbled upon the moment captured above. I felt the framing and along with the level’s geometry really are a master craft in teaching the player how to navigate the space.

  1. Our eyes are immediately drawn to the light coming in from the top of the screen. The bright color contrasts the rest of the image. Light rays help guide the player upward and finally once we arrive at the top of the screen our gaze is captured by the lone red flag waving in the wind.

  2. From here we naturally wanna work our way down the space.The affordance of the golden paint has been taught to us at this point in the game and we know that when used on walls we can climb that object. This focuses our vision with our goal of reaching the red flag we can start to imply a route.

  3. The stone with the golden chain is another great example of object affordance. We know we can climb the chain but the chain must be knocked down by Kratos or Atreus. In addition the texture of the chain stands out from this rest of this imagery in the scene. Capturing the player’s attention and providing clues about how to traverse.

  4. Here we have some subtle leading lines that point to the intersection of the rock walls. More gold paint allows us to trace the path.

  5. A large golden circle and the slightly inset to the rocks really help connect the climbable wall to the wooden platforms below.

  6. The contrast of the torchlight help to highlight the gap in the platform and imply the importance of the bridge. In order to progress we have to bring that bridge down.

  7. The second chain we see brings everything we just observed into range and with the gold paint on the wood under it we know we can eventually climb this short structure. This also brings us back down to ground level where the player currently is. We can observe the entire path from this location and just have to figure out our first step.

  8. We do see a gear below the bridge. This object stands out from the rest and it’s affordance tells us we can freeze it once the bridge is in place. from here it’s a matter of finding the device to activate the bridge.

  9. Finally we can get a glimpse of a staircase in the bottom right corner of the map. This helps lead to the first piece of the puzzle which is sending Atreus up onto the platform.

This is a quick entry in the blog but I just felt this was a such a strong image that really stresses the importance of framing. As soon as Kratos climbs onto this ledge all the information is available to the player. With great use of lighting texture and solid geometry the player can piece together the clues and figure out the area for themselves. As always thanks for reading and please look forward to more entries based on God of War in the near future.

Level Design - Sekiro Ashina Outskirts

Ashina Outskirts


Players of Sekiro: Shadows die twice may remember the battle with General Tenzen Yamauchi a harrowing encounter against a named Samurai General. The truth star of this fight is not the General himself by the finely crafted courtyard that surrounds him. After a battle with a chained ogre, the player grapples into a narrow corridor up above. A scouting tool is found a small opening appears to our right.

Sekiro - Map Recreation


2 - Affordance

Following the narrow corridor to continue scouting, we get a few more simple lead lines encouraging us to hug the rickety fence on the right. Fortunately, Sekiro has taught us tall grass’ affordance that it provides cover an the ability to sneak.

The tall grass leads us into the fence on our left. As we approach, we can observe the patrolling enemy and the stationary, but more importantly, a gap in the fence leads our eyes to discover a cliff ledge. Once again, when we see this white texture on the edge of the cliff and the affordance is clear we can hang and sneak closer to our target.


3

On the other side of the level leading past the sentry, we can see some more examples of Affordance. Once again, tall grass and a cliff edge are used to indicate a safe sneaking route. Additionally, a thick tree branch protrudes from the intersection of our leading lines. Sekiro has taught that a tree branch is a grapple point and an great perch to survey our surroundings. This path also now provides the player with a full route around the courtyard and an excellent opportunity to spot every enemy kill the sentry and form a plan of attack.

We can proceed with facing the mini-boss or…

move on towards the castle.


4

In the far back section of the level we find a broken bridge that leads us towards the castle off in the distance. A torch off in the distance uses lighting to clarify to the player this is an area we should head towards. An alternate path must be found. At first glance it may not appear obvious but the Tree Branch’s Affordance shows us there must be something below. We Look downward and and see a soft blue light indicating an idol is nearby. This sets our player on a new path.

1 -Overlook, Leading Lines, & Lighting

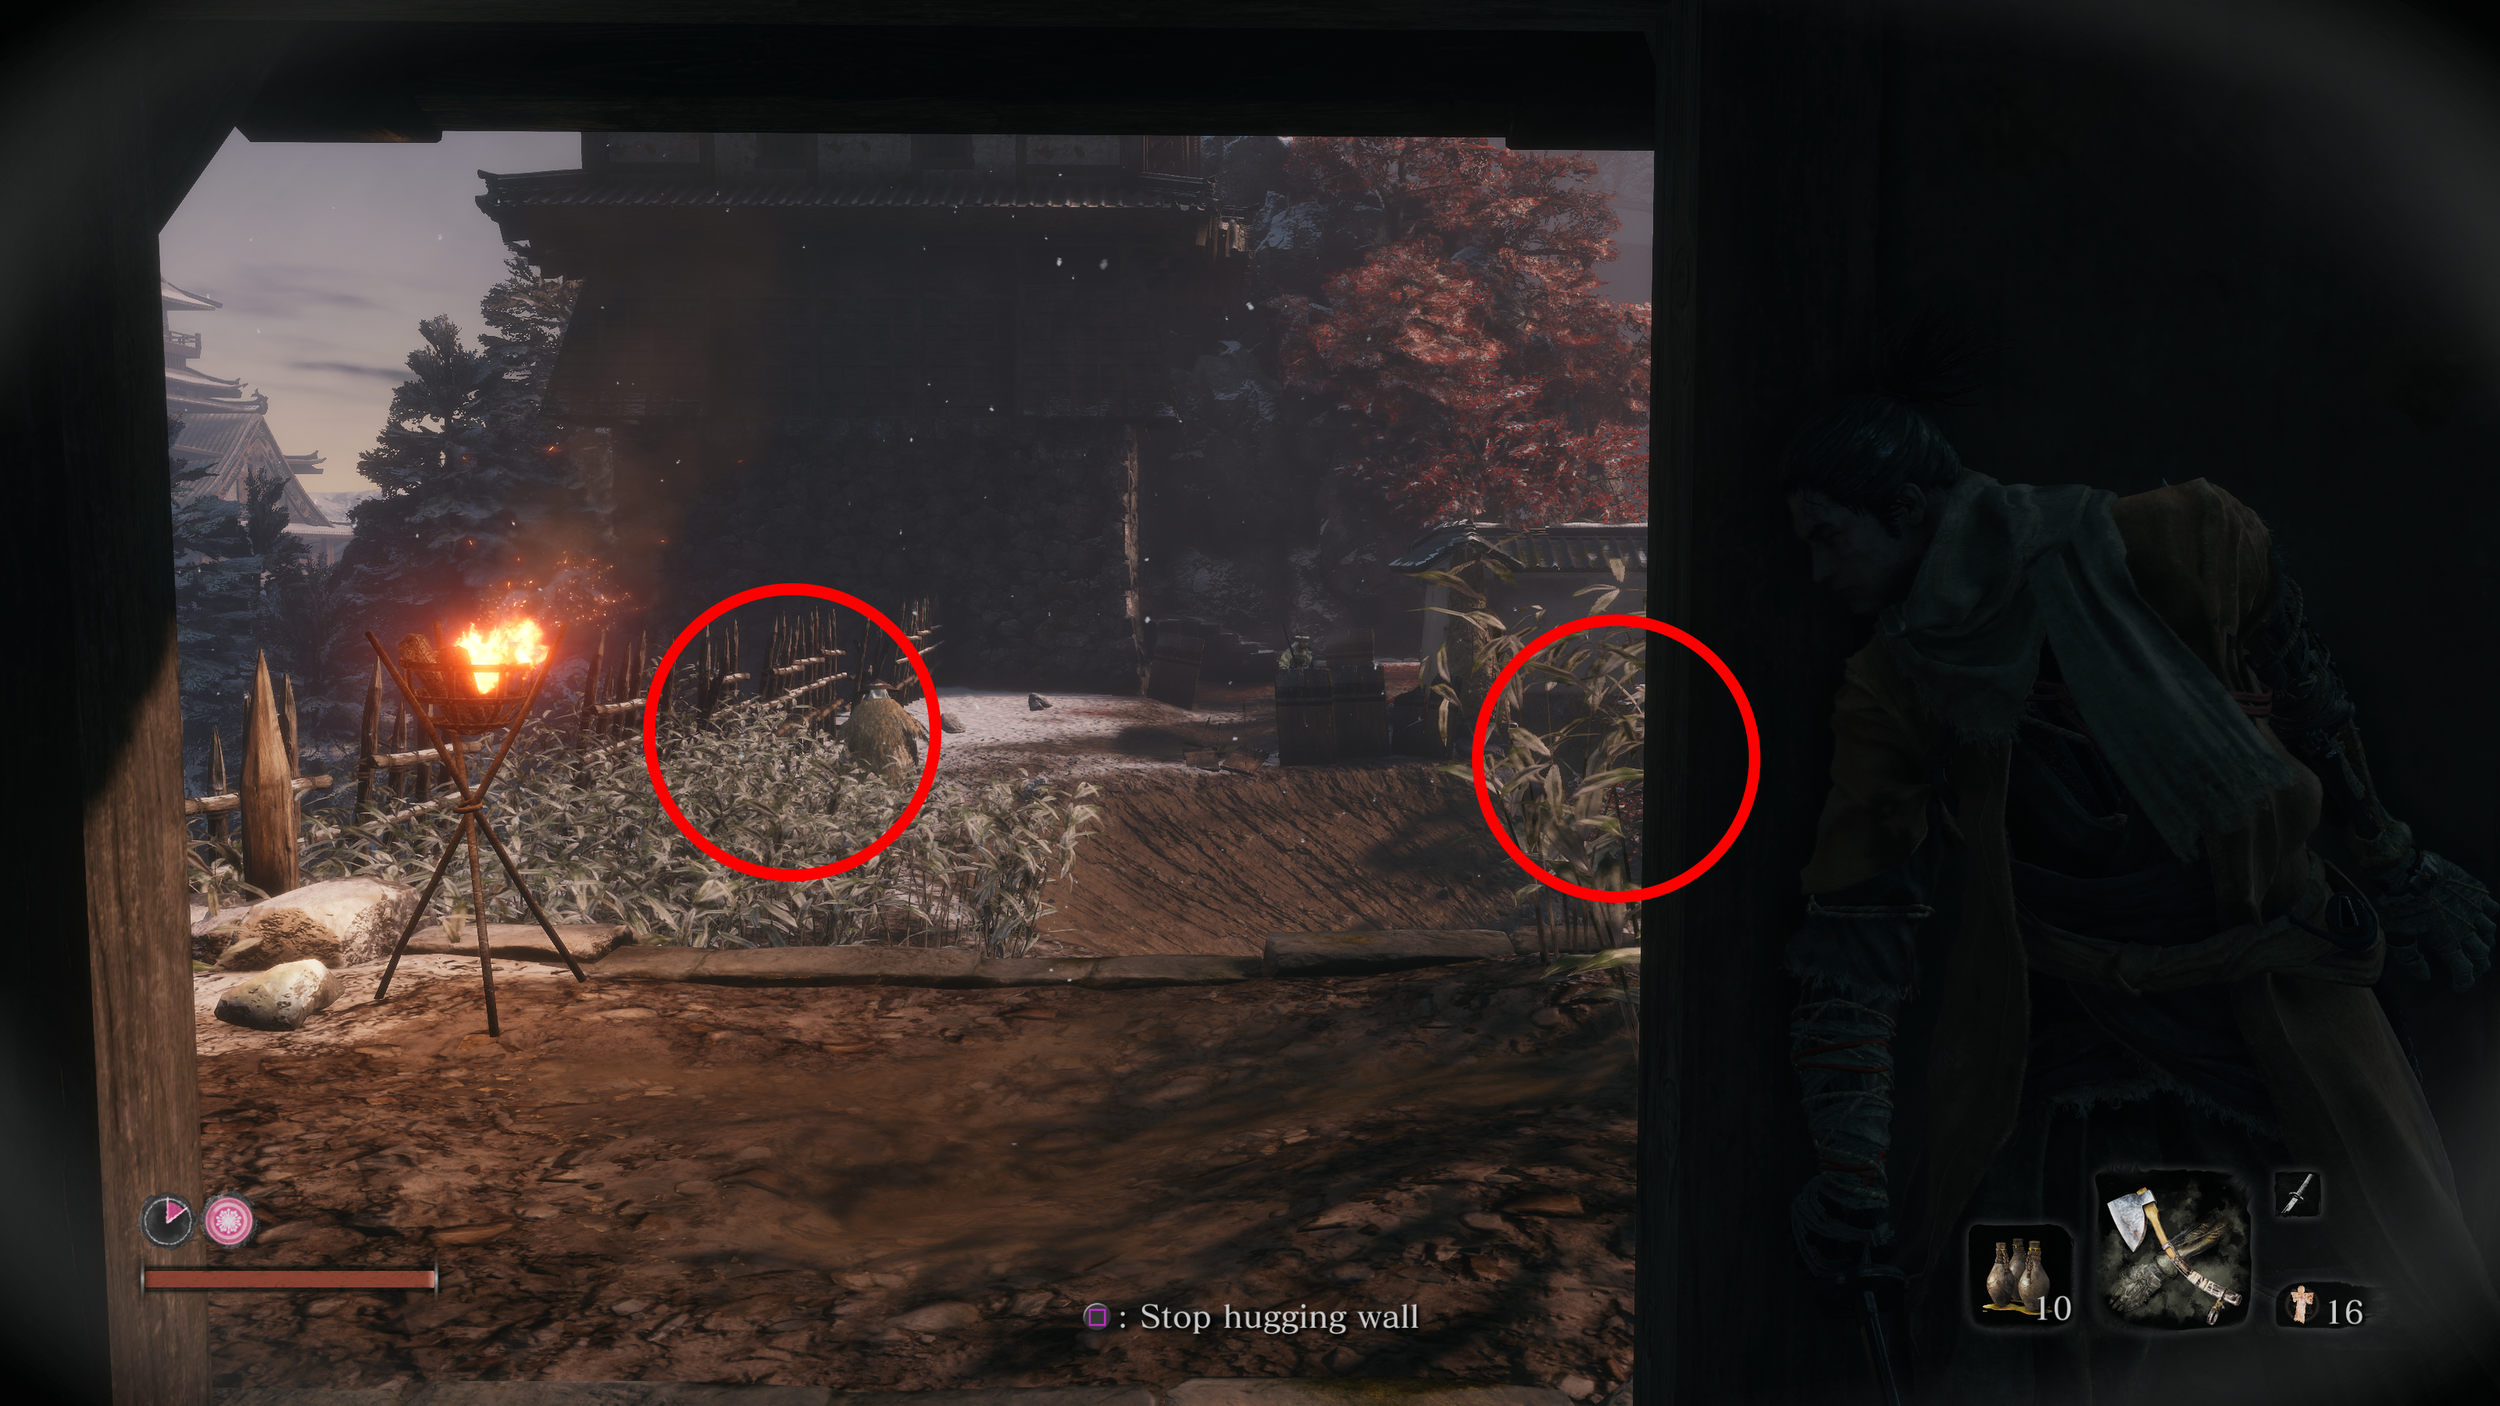
In this example, I believe the designers at From Software do an excellent job showing where each enemy is located however it is done in a manner that suggests it to the player allowing them to feel they discovered each enemy on their own. The scroll and torch circled in the example image is our first focus point. Good contrasts with the dark hallway, the bright light of the torch and the tall scroll stands out and takes advantage of the leading lines created by the broken wood. This scroll also happens to be the location of our mini-boss and quickly establishes a goal to our players.

Goal: Defeat General Yamauchi

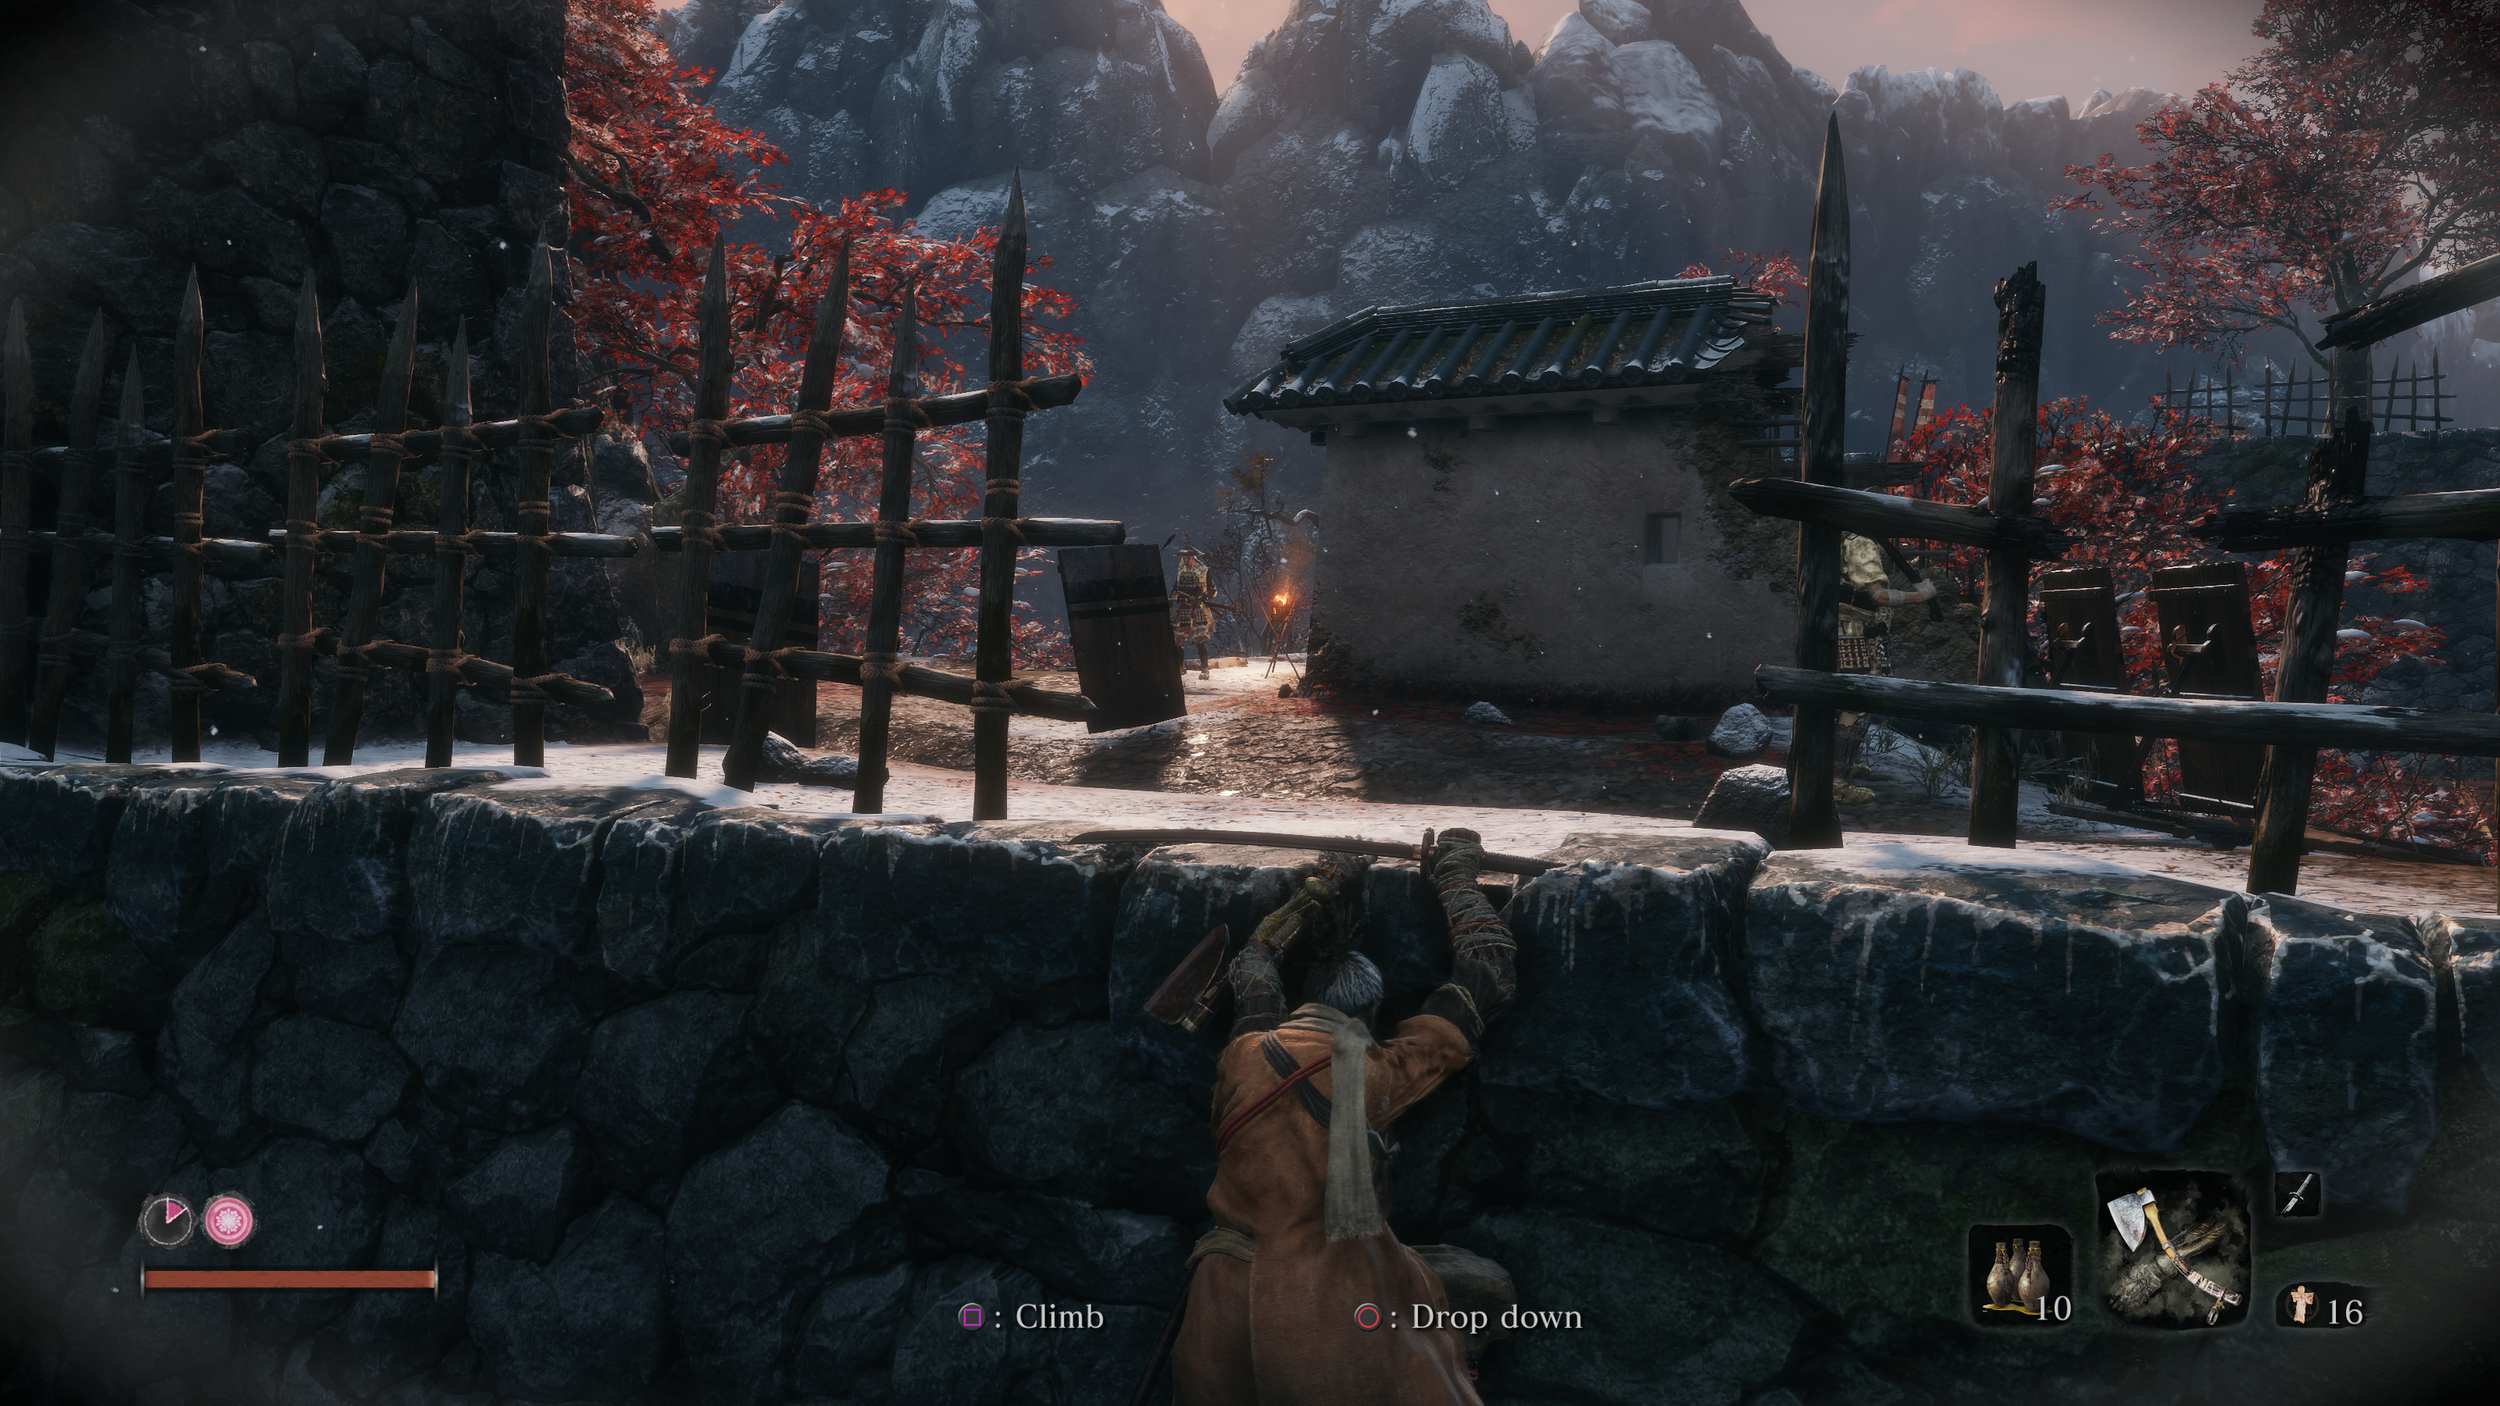
With this discovery, the player's eye moves upward to enemy patrol behind him and then to the broken wall section above. This area is also complimented by a torch to ensure the player stays focused and sees the next enemy above.

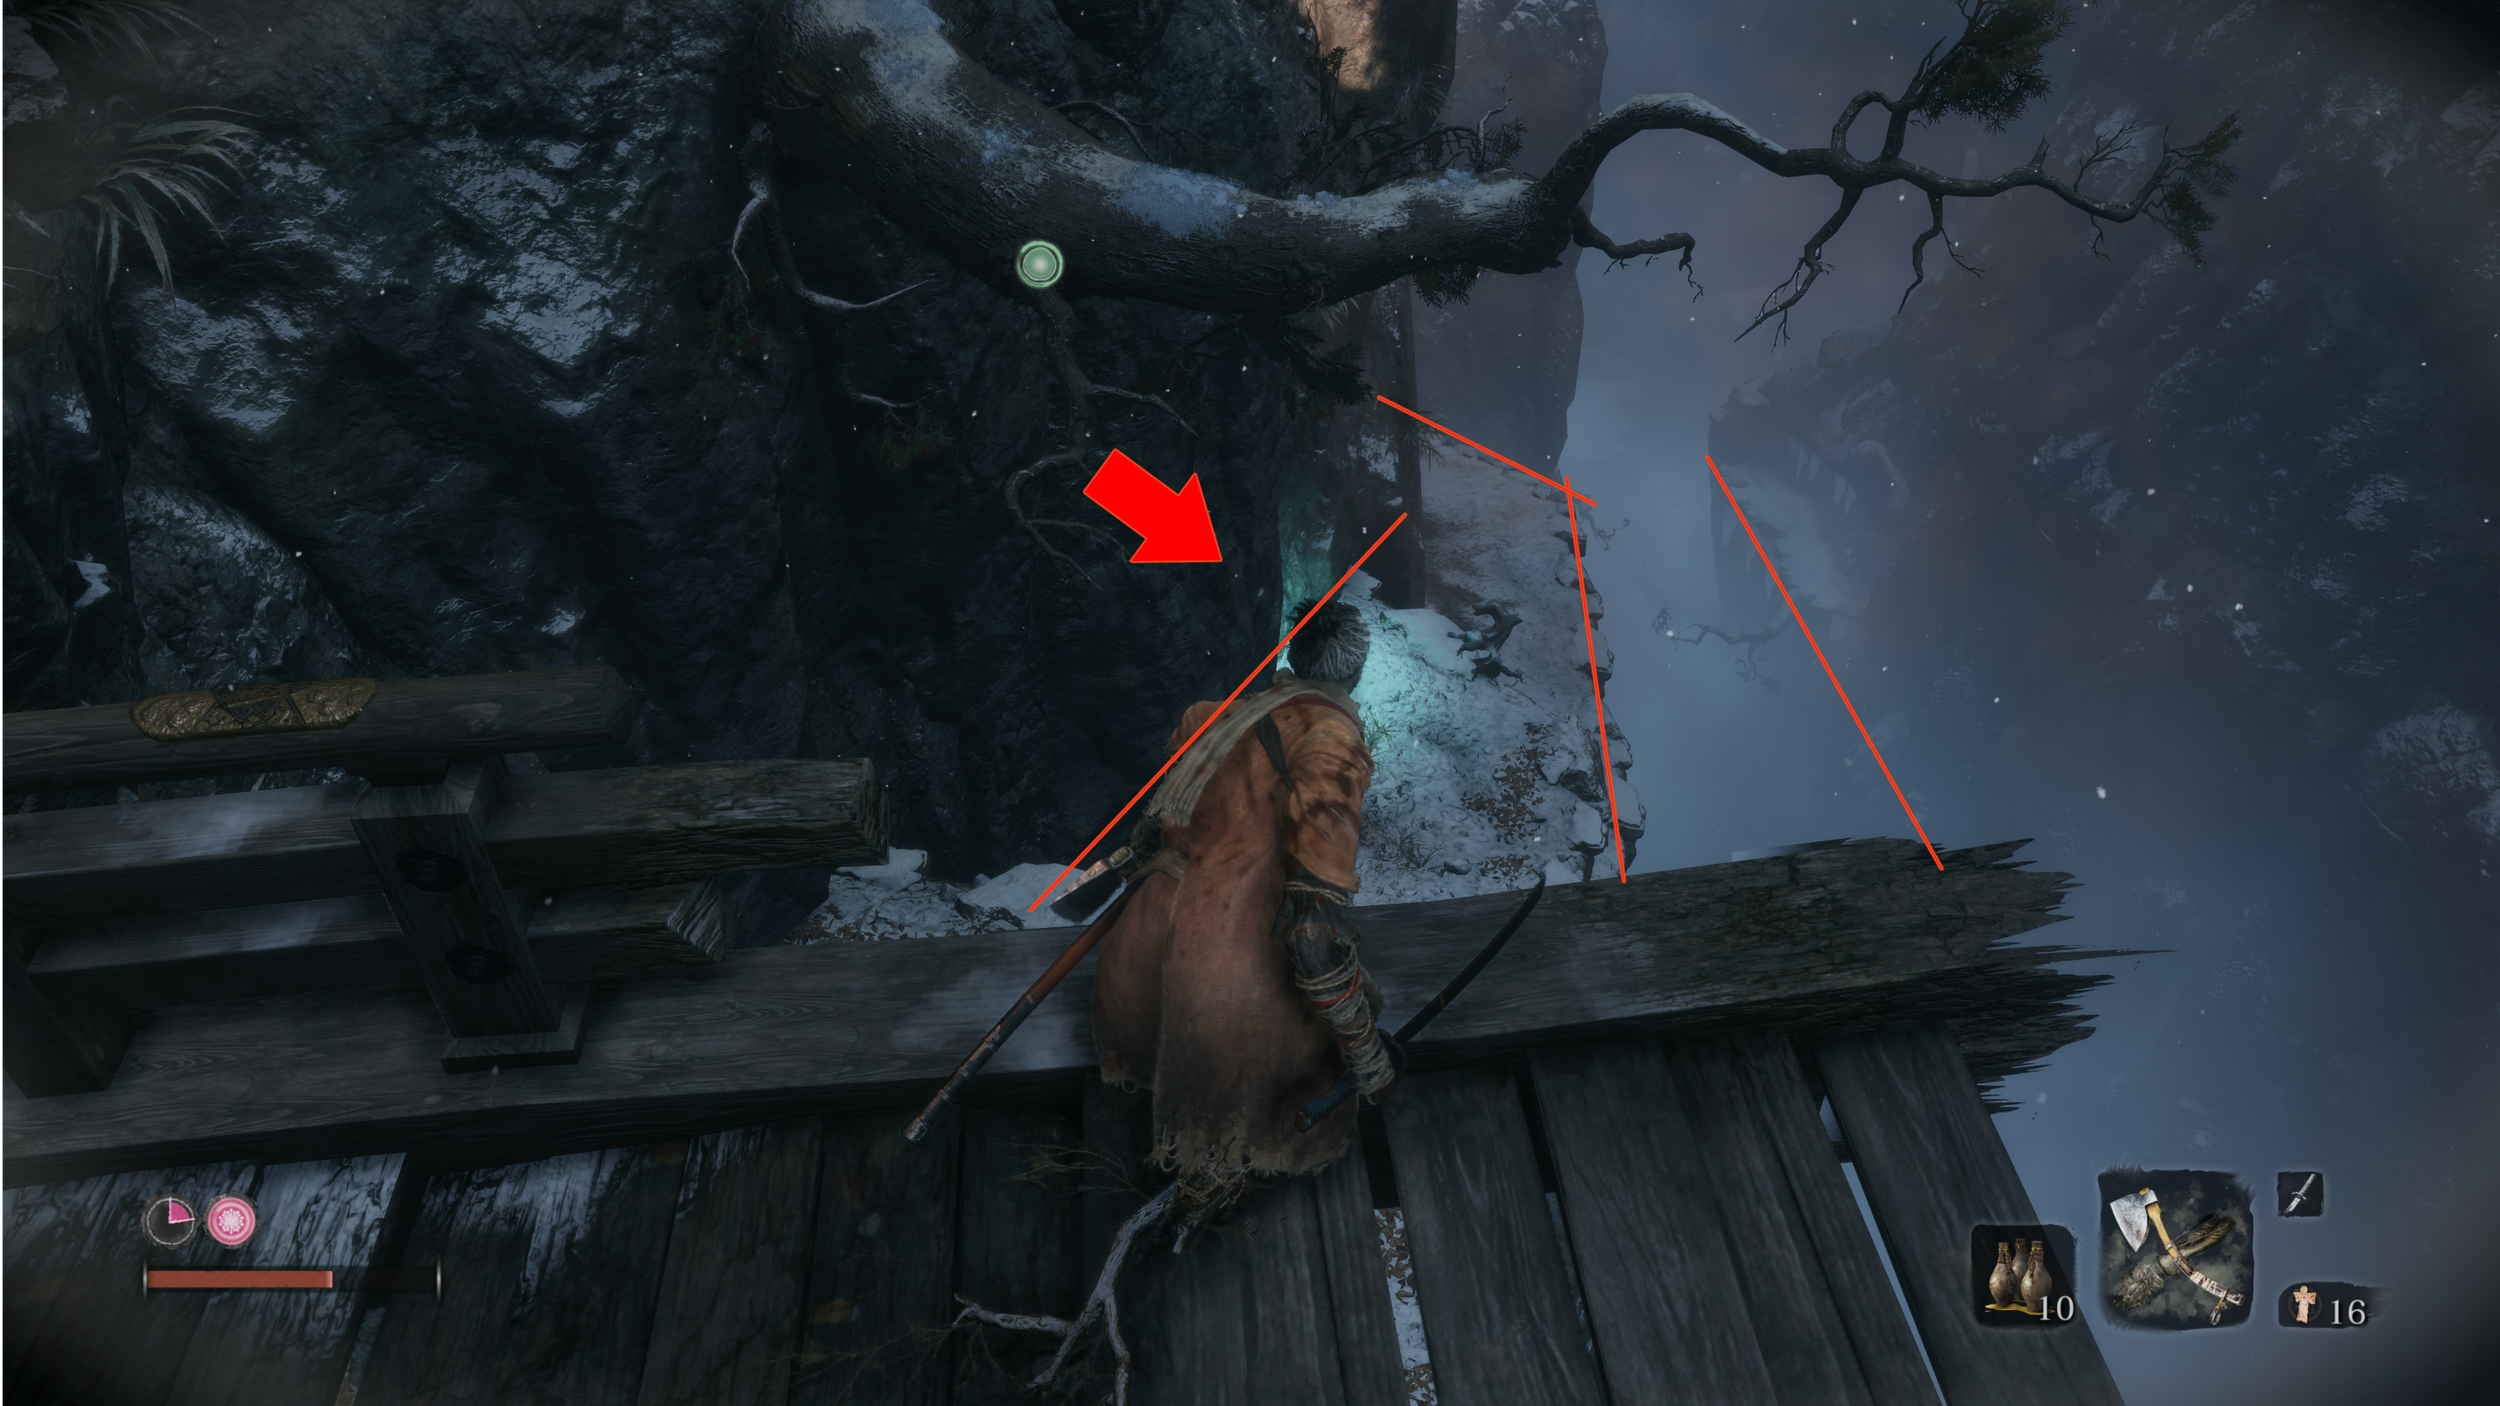
In this small opening, we can see a tree branch. The branch leads up a bit further to the right and a very easy to miss enemy the sentry. This enemy is precisely placed to teach players a lesson about rushing and not properly scouting. At the start of this section, you obtain the Ninja Monocular which serves as a hint to scout.

With the sentry spotted the player must now figure out a way up and our final torch on the right side of the screen helps guide our eyes to another branch and a small ledge we can hang from. The player has two possible routes ahead of them continue scouting to the left, or move towards the sentry.

In this one image, we have a couple of great examples of leading lines and lighting to quickly allow us to orientate ourselves and discover all the enemies, in addition, each enemy is always placed near a red color-coded object. Tree leaves, torch, or banner. This subtle touch helps train our brain what to look for.

In Conclusion: Sekiro has a clear and consistent language in it’s level design. It provides us with immense challenge but that challenge is both fair and approachable thru it’s design. In the above examples we have covered the following.

Leading Lines - To reveal enemies and set objectives.

Lighting - To highlight key objects or focal points.

Color Coding Blue = Safe , Red = Danger

Affordance Clear understanding of objects usage through repetition and shape theory.

The above screenshots also contain of variety of other techniques such as signposting, bread crumbing, and Denial and Reward the later of which we can do an entire blog on. Thanks for reading and stay tuned for the next post.